Facebook Pixel allows you to track what users are doing on your site, collect remarketing audiences and create lookalikes. If the Facebook pixel is implemented correctly, it will feed relevant information to FB machine learning algorithms. FB ML will use pixel data to show your ads to people who are most likely to convert.
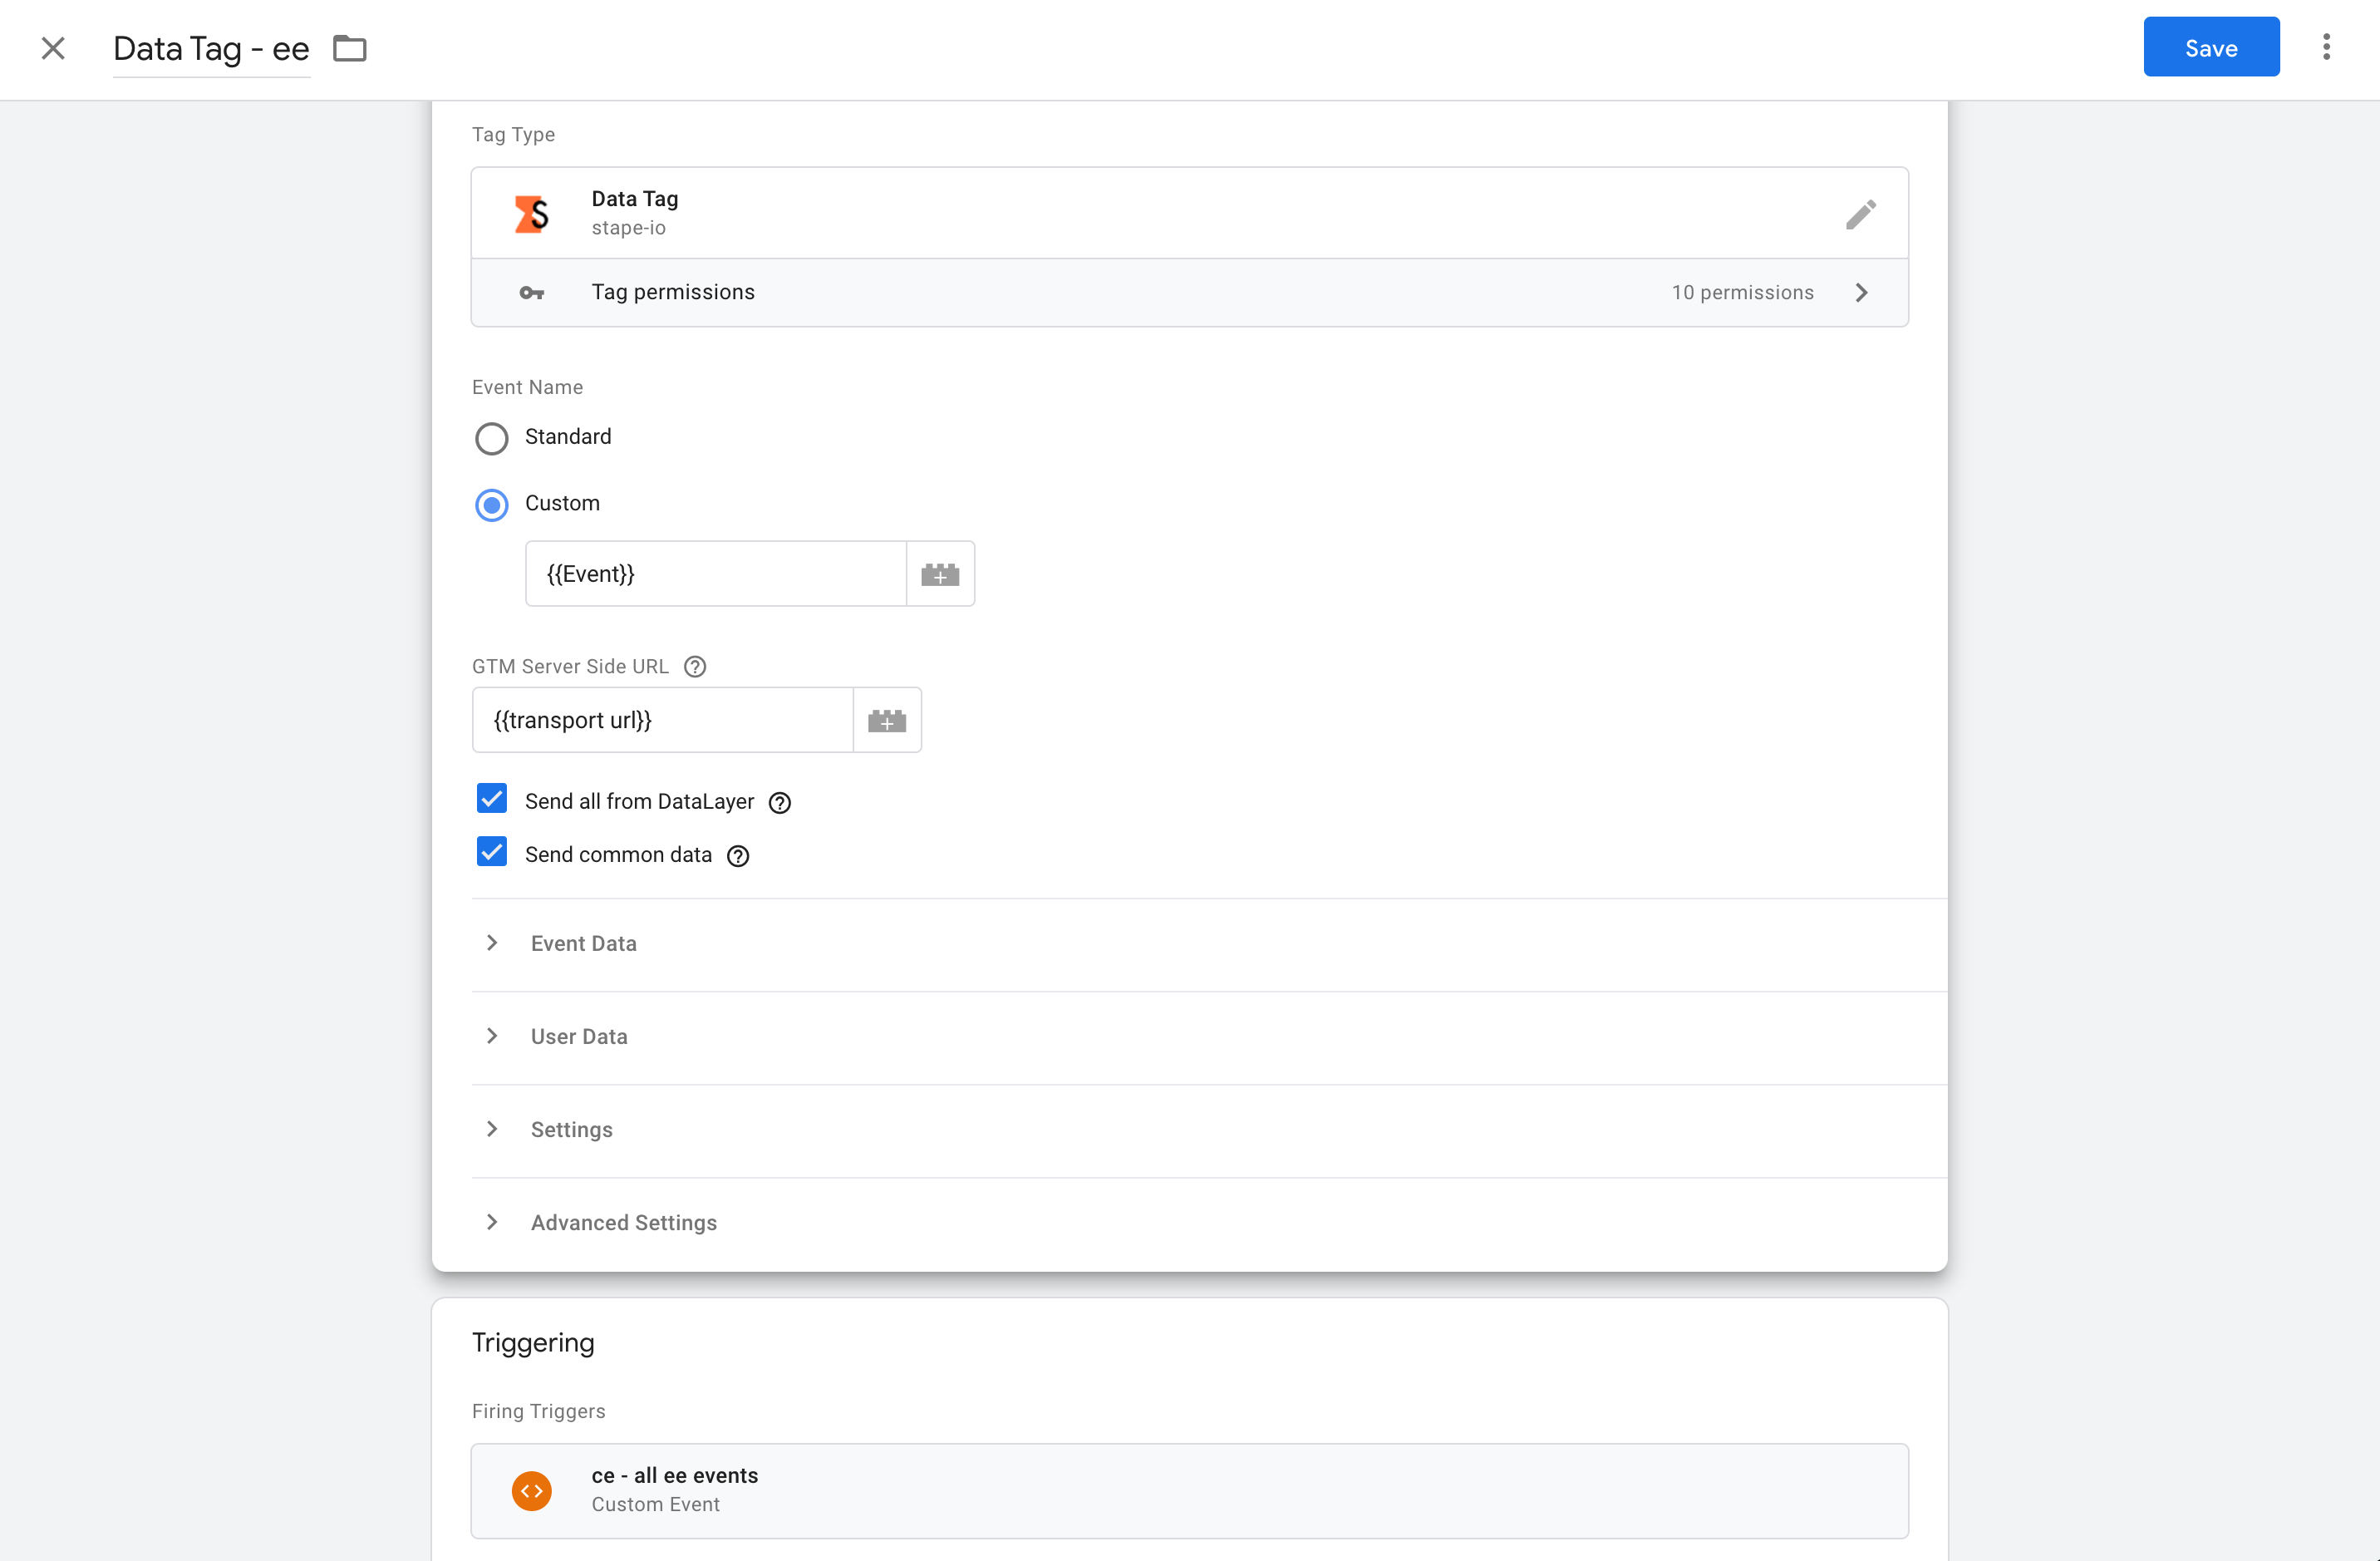
1. Follow all steps from these articles to set up the Google Tag Manager server container and send data to the server container. You have two options for sending data to the server container: using Google Analytics 4 server-side or Data Tag/Data Client.
If you already set up GA4 server-side or plan to start using GA4, it looks like the GA4 method is for you. But this implementation has its cons – the most significant one is that GA4 requests can be blocked by some adblocker. In contrast, the Data Tag and Data Client are resistant to these restrictions. We have a recent post that describes how to avoid Google Tag Manager request blocking by adblocker.
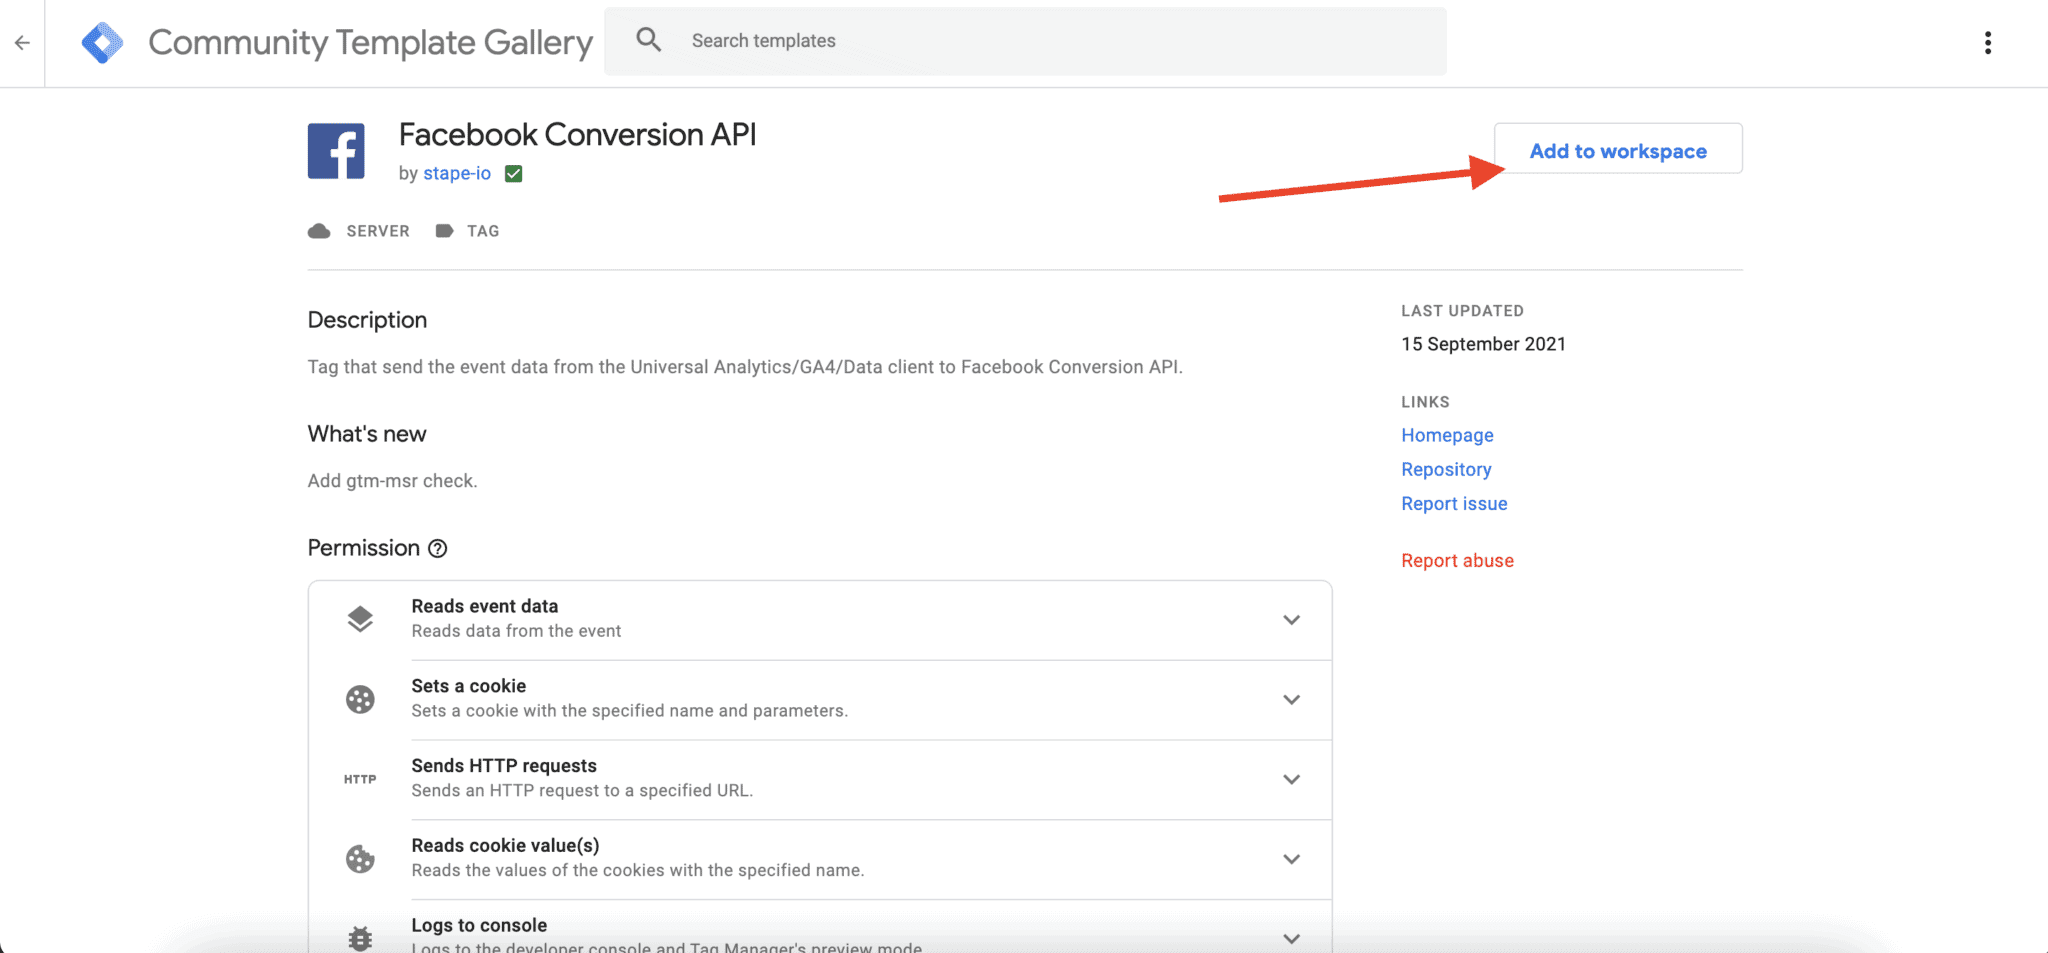
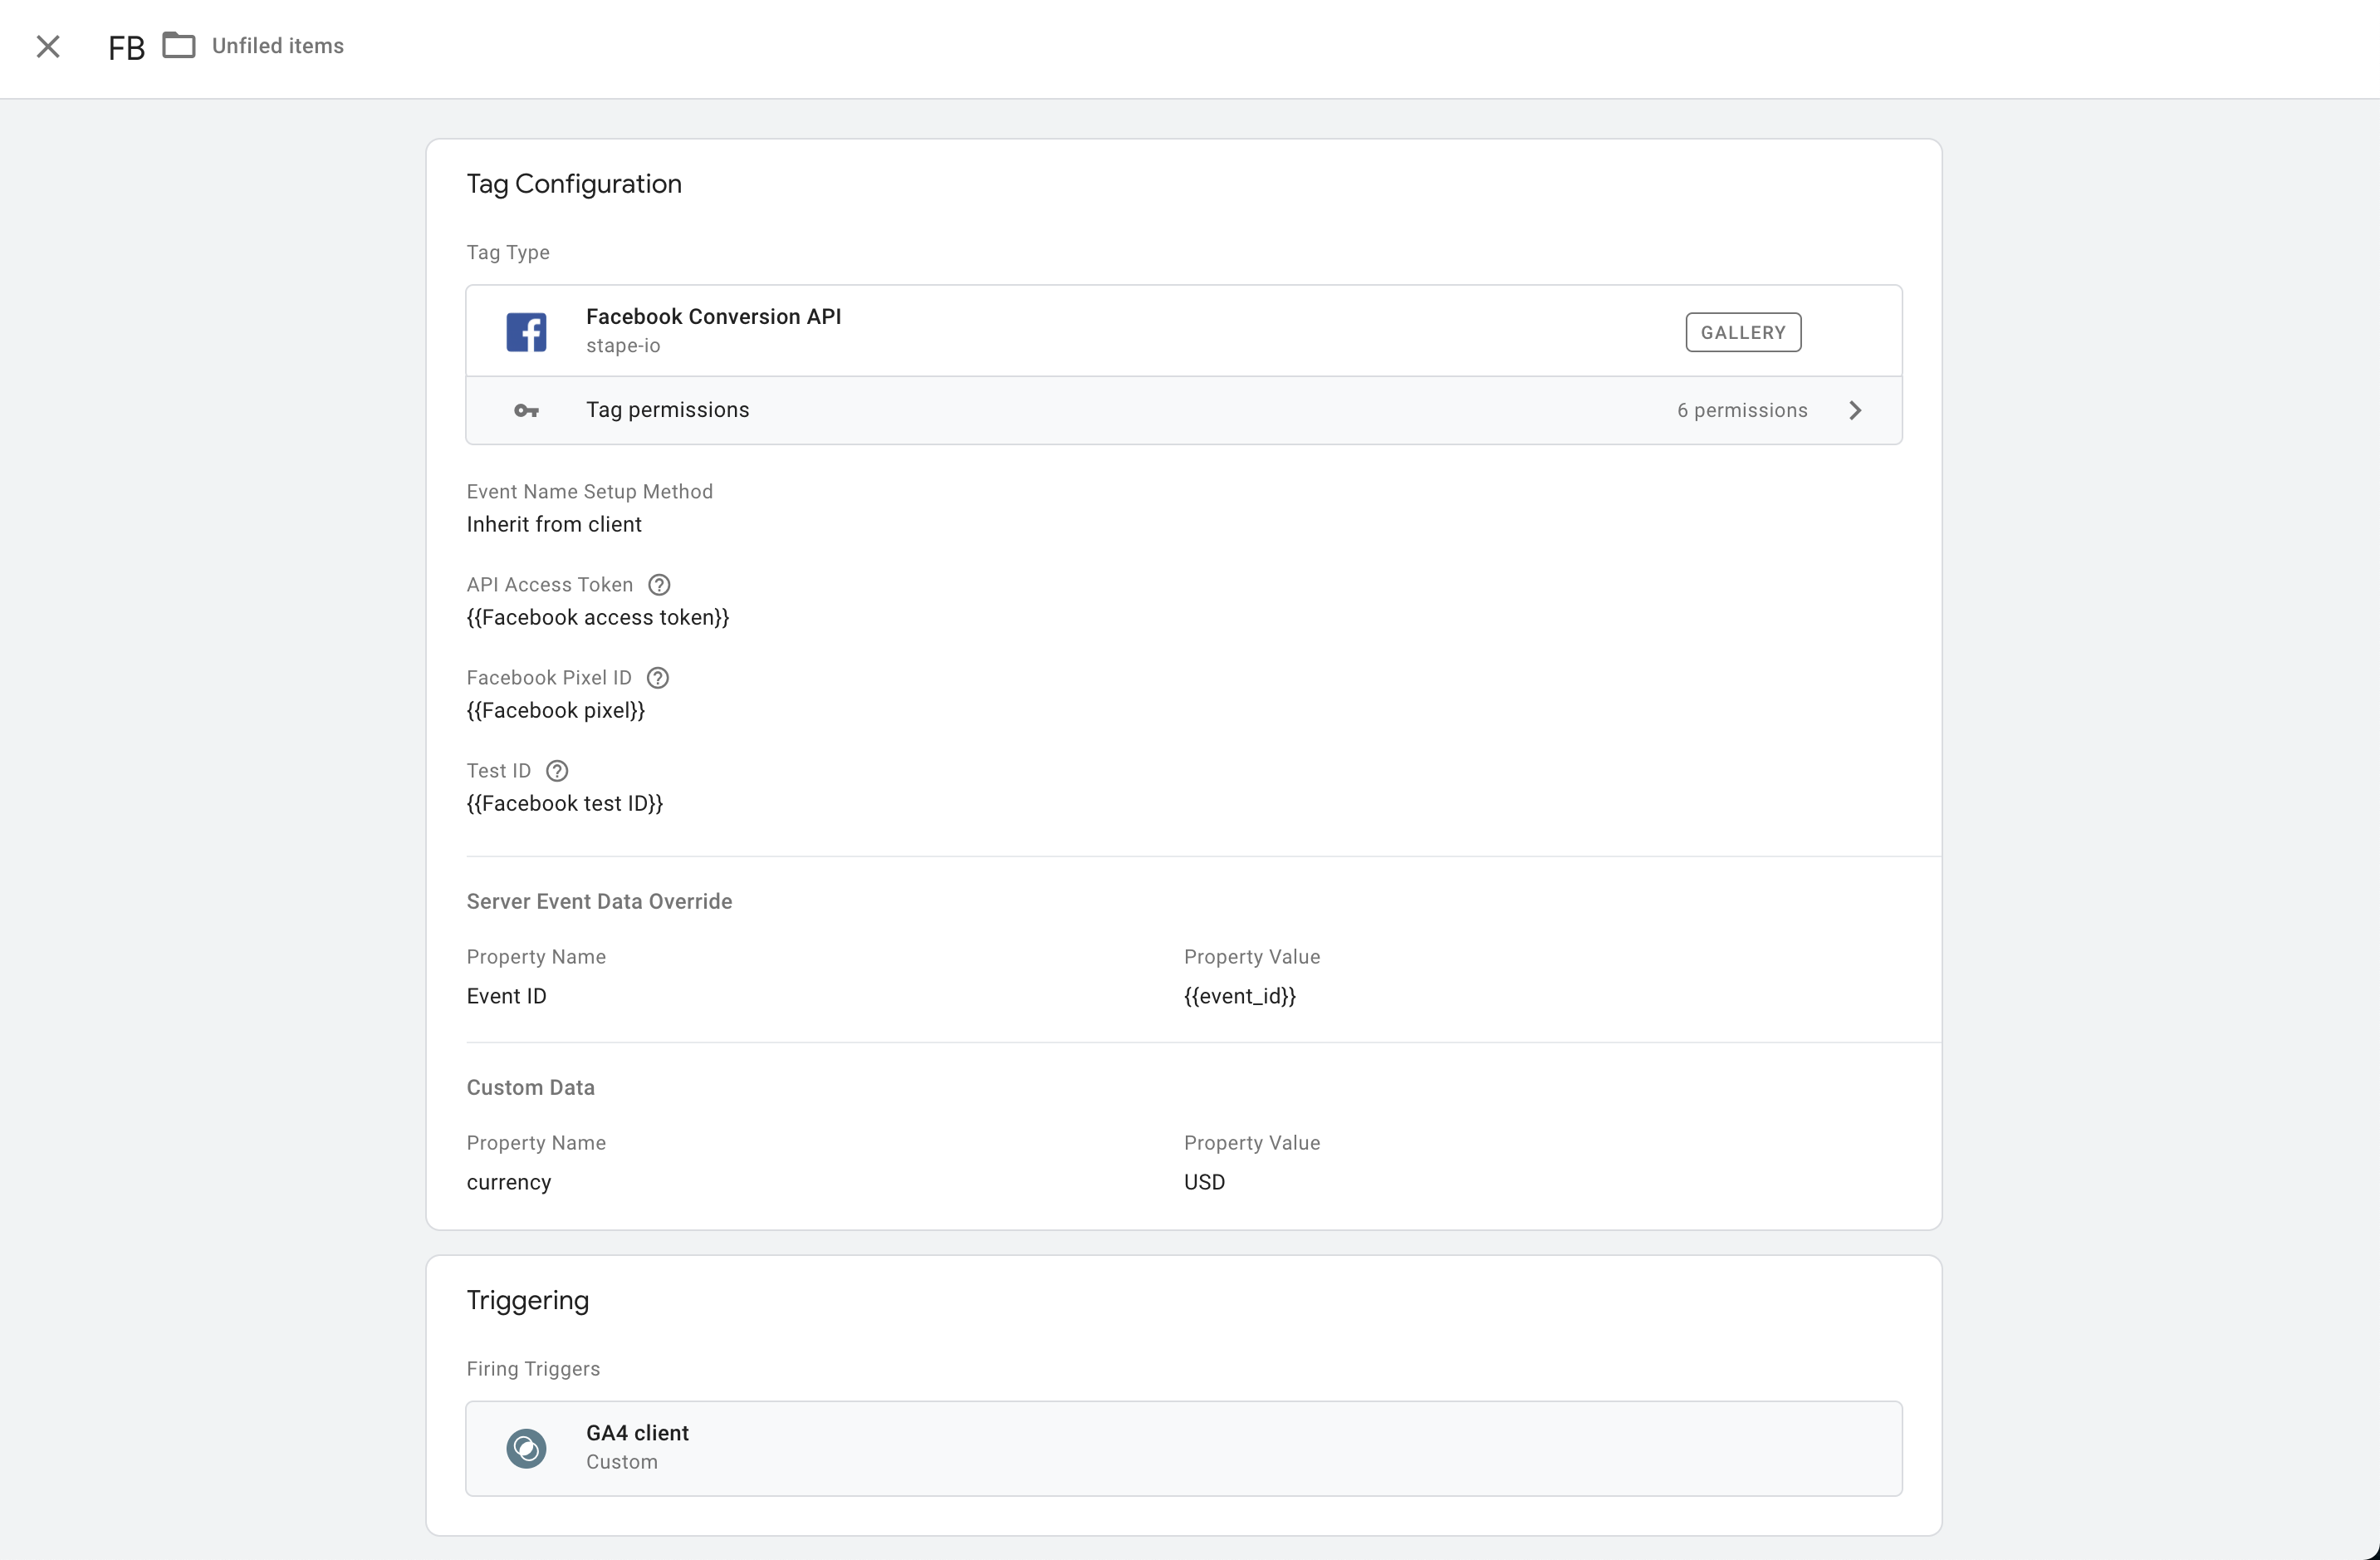
2. Go to Google Tag Manager Server Container. Add Facebook Conversion API tag from the Template Gallery.
3. Create Facebook Conversion API Tag inside Google Tag Manager Server Container. Choose Tag -> Click new -> Choose Facebook Tag that you’ve imported in the previous step. Add your Facebook pixel ID and Facebook API Access Token (I recommend adding it as a variable since you will need these values for each Facebook event you want to track). If you don’t know your Facebook API Access Token, this documentation will help you find it.
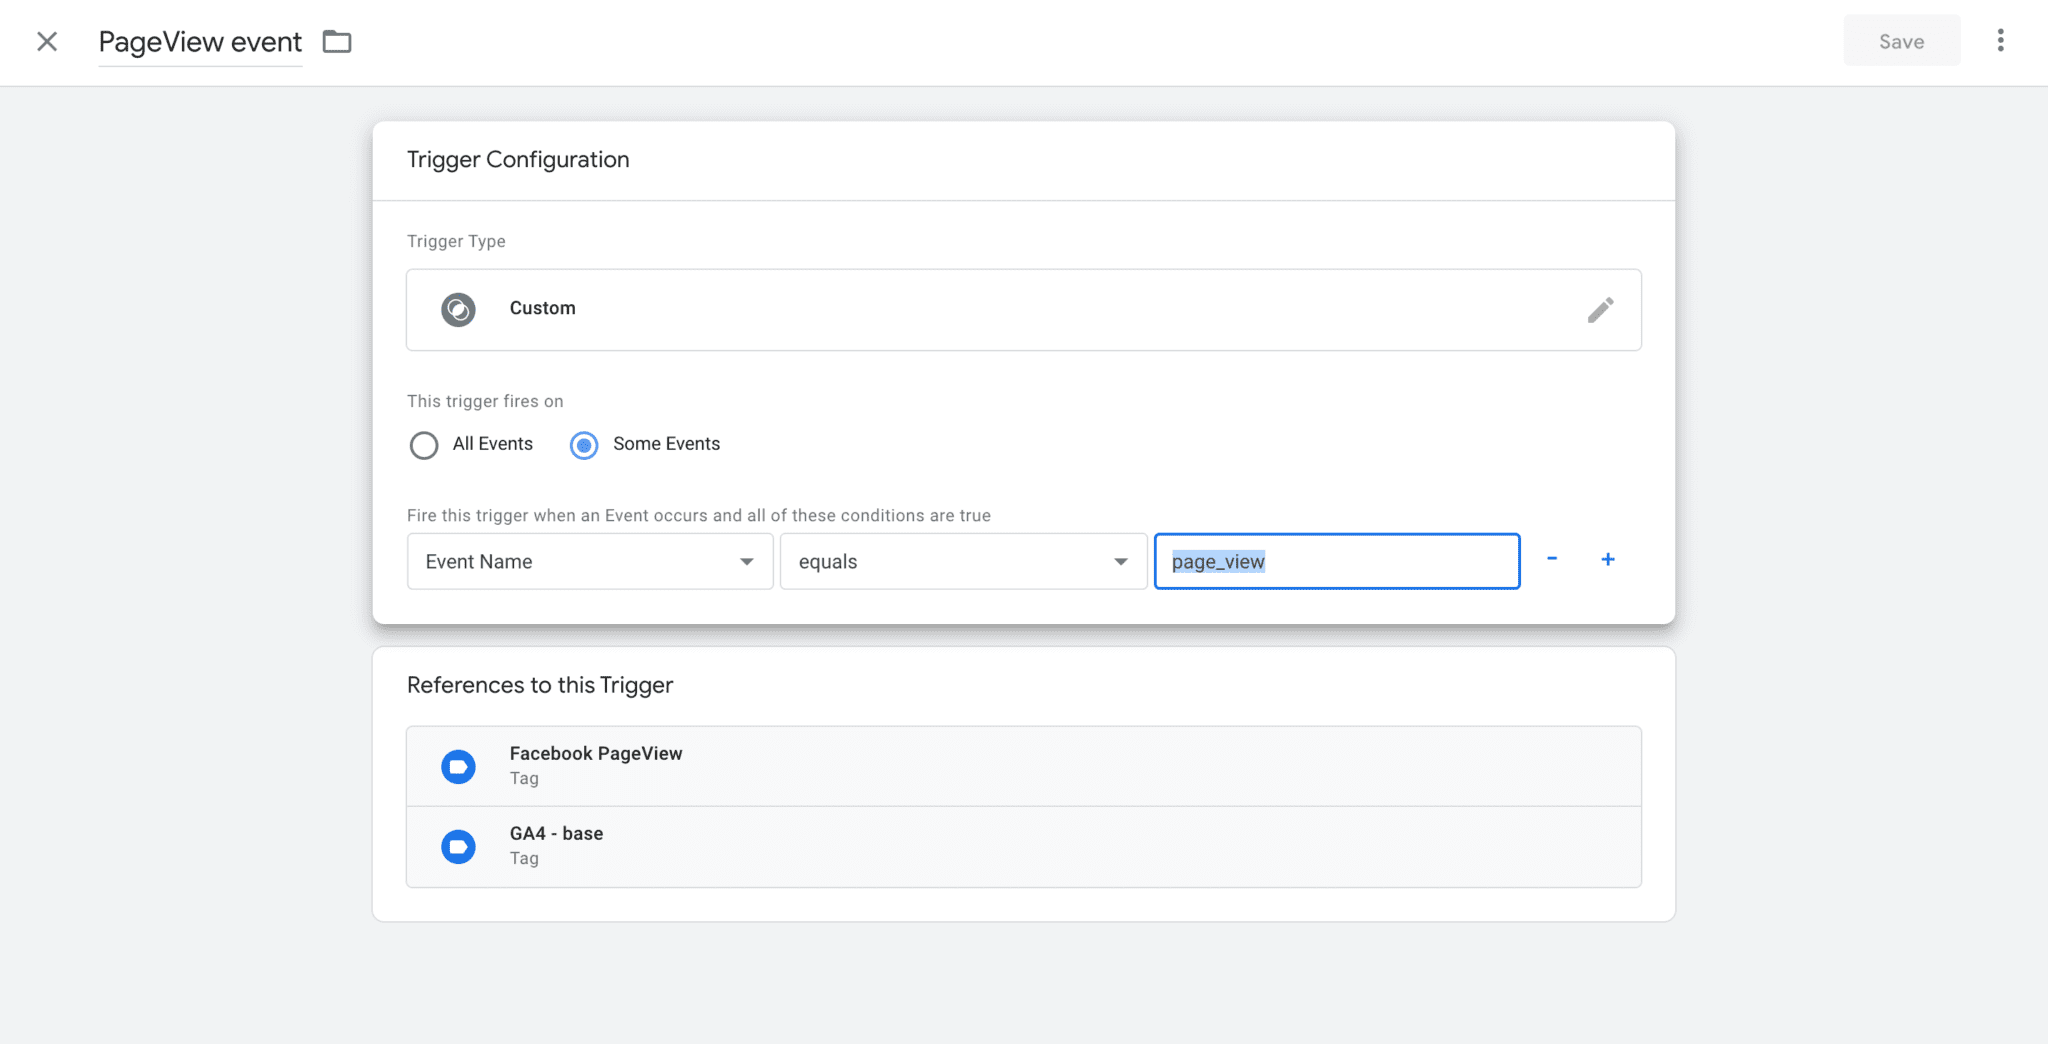
Configure trigger for Facebook Conversion API base tag: click new trigger -> custom trigger -> event name equals page_view.

4. You have 2 options for configuring our Facebook conversion API tag:
-
Override. In this case, you’ll need to set up FB events manually. We will cover how to manually set up FB server events in step #5.
-
Inherit from GA client. In this case, we will match your Universal Analytics or GA4 events into Facebook standard events. If we can’t match the GA event into the standard FB event, we will record it as a custom event. Everything will be done automatically, you don’t need to set up FB events.
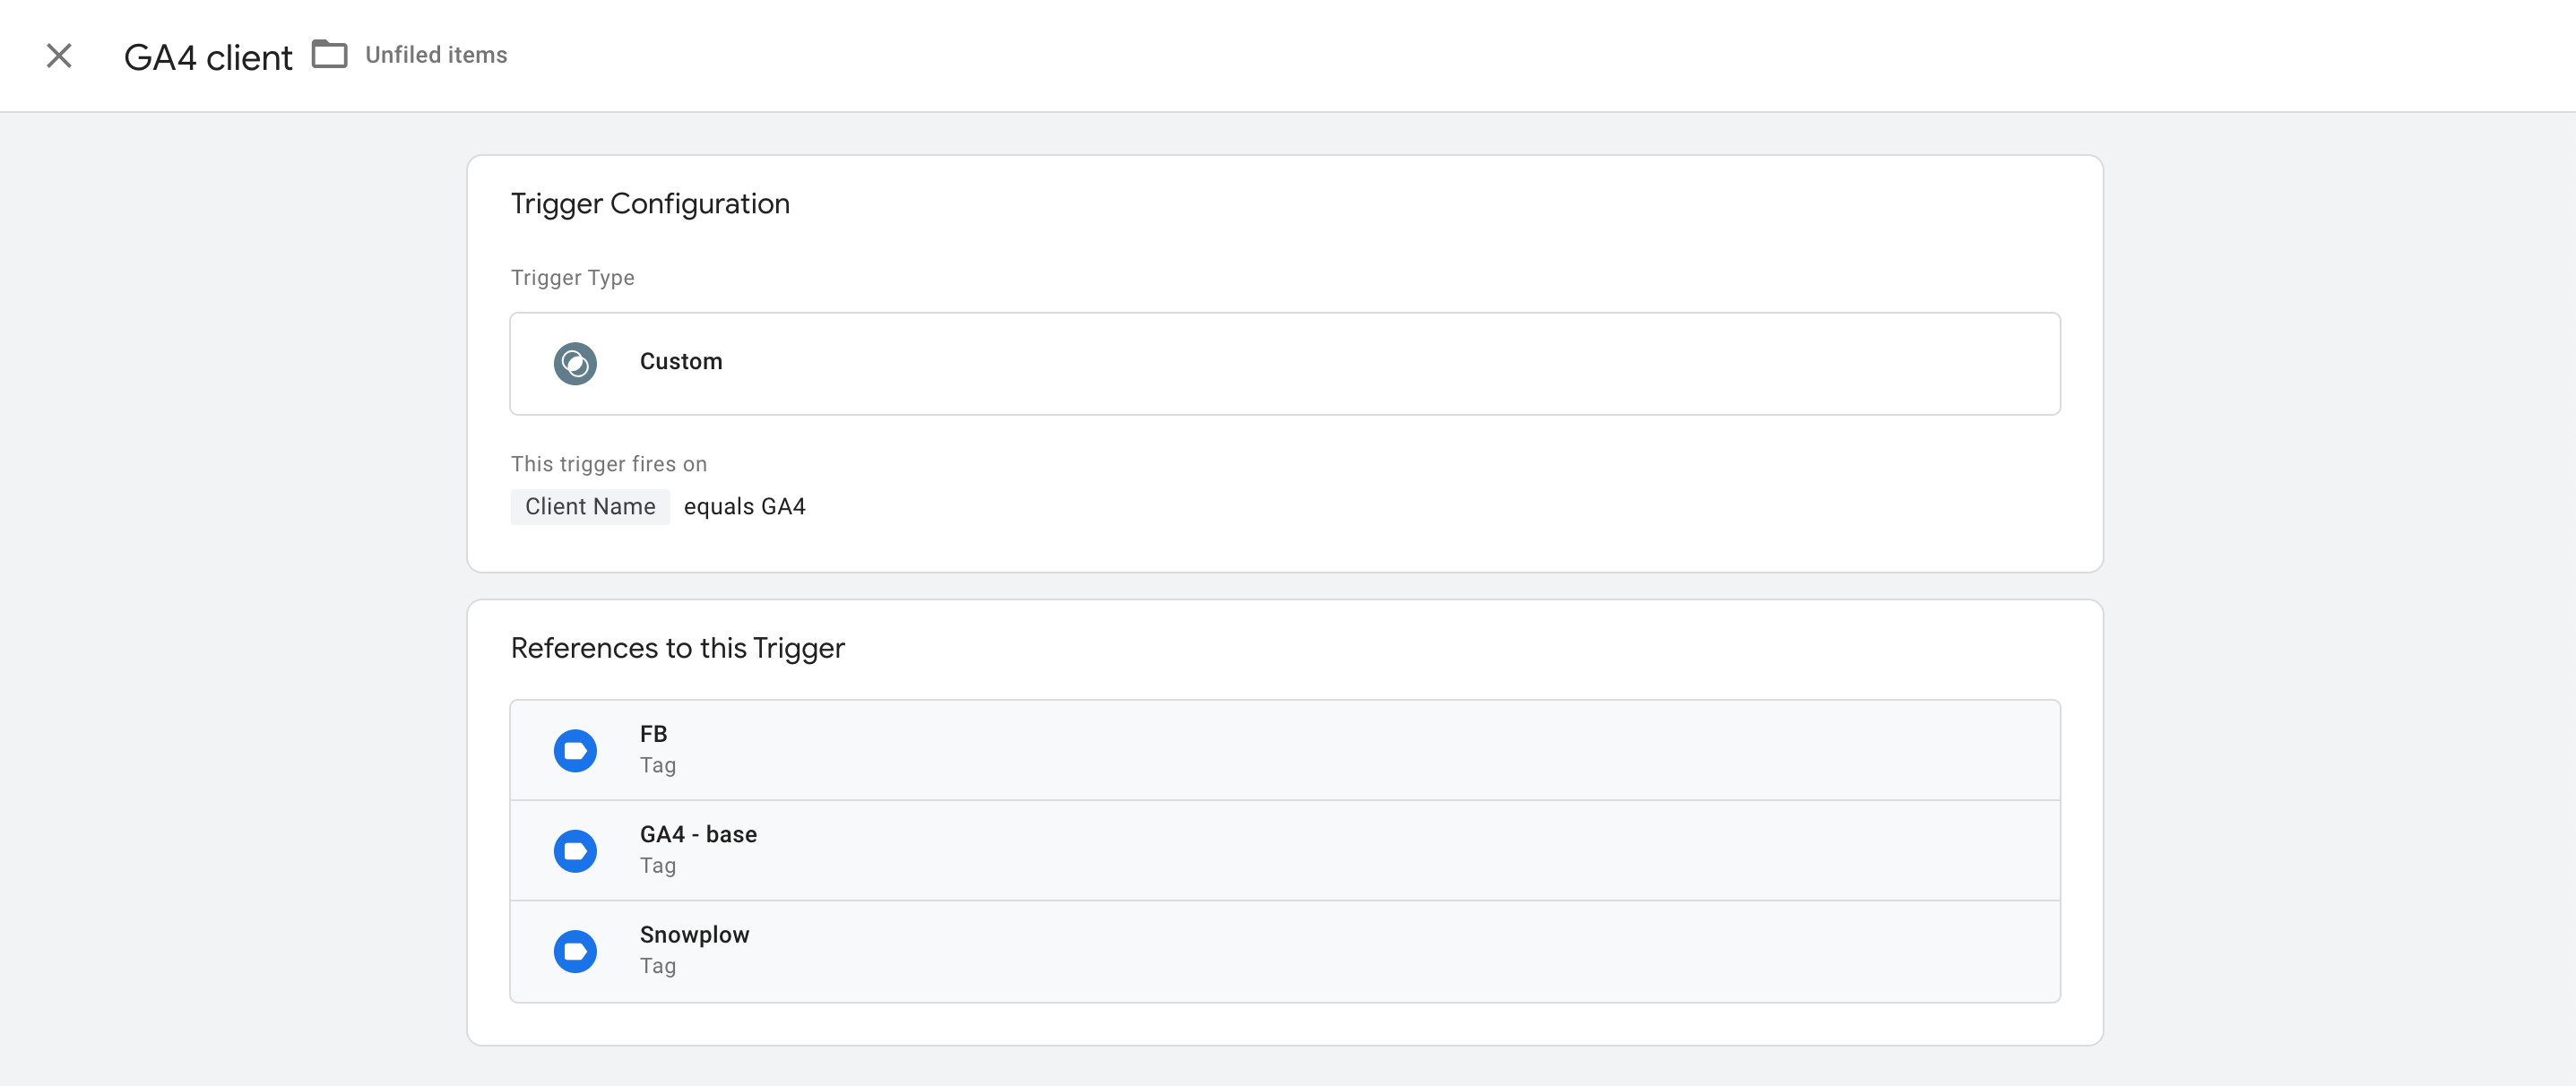
5. If you’ve selected the override option, you’ll have to use Universal Analytics (or GA4, or Data Tag/Data Client) events to trigger Facebook server events. Facebook pageview event should trigger on a custom event page_view that was claimed by specific client.(for example if you chose to use GA4 as a data source for the Server GTM, then then you should use page_view event when client name equals GA4).
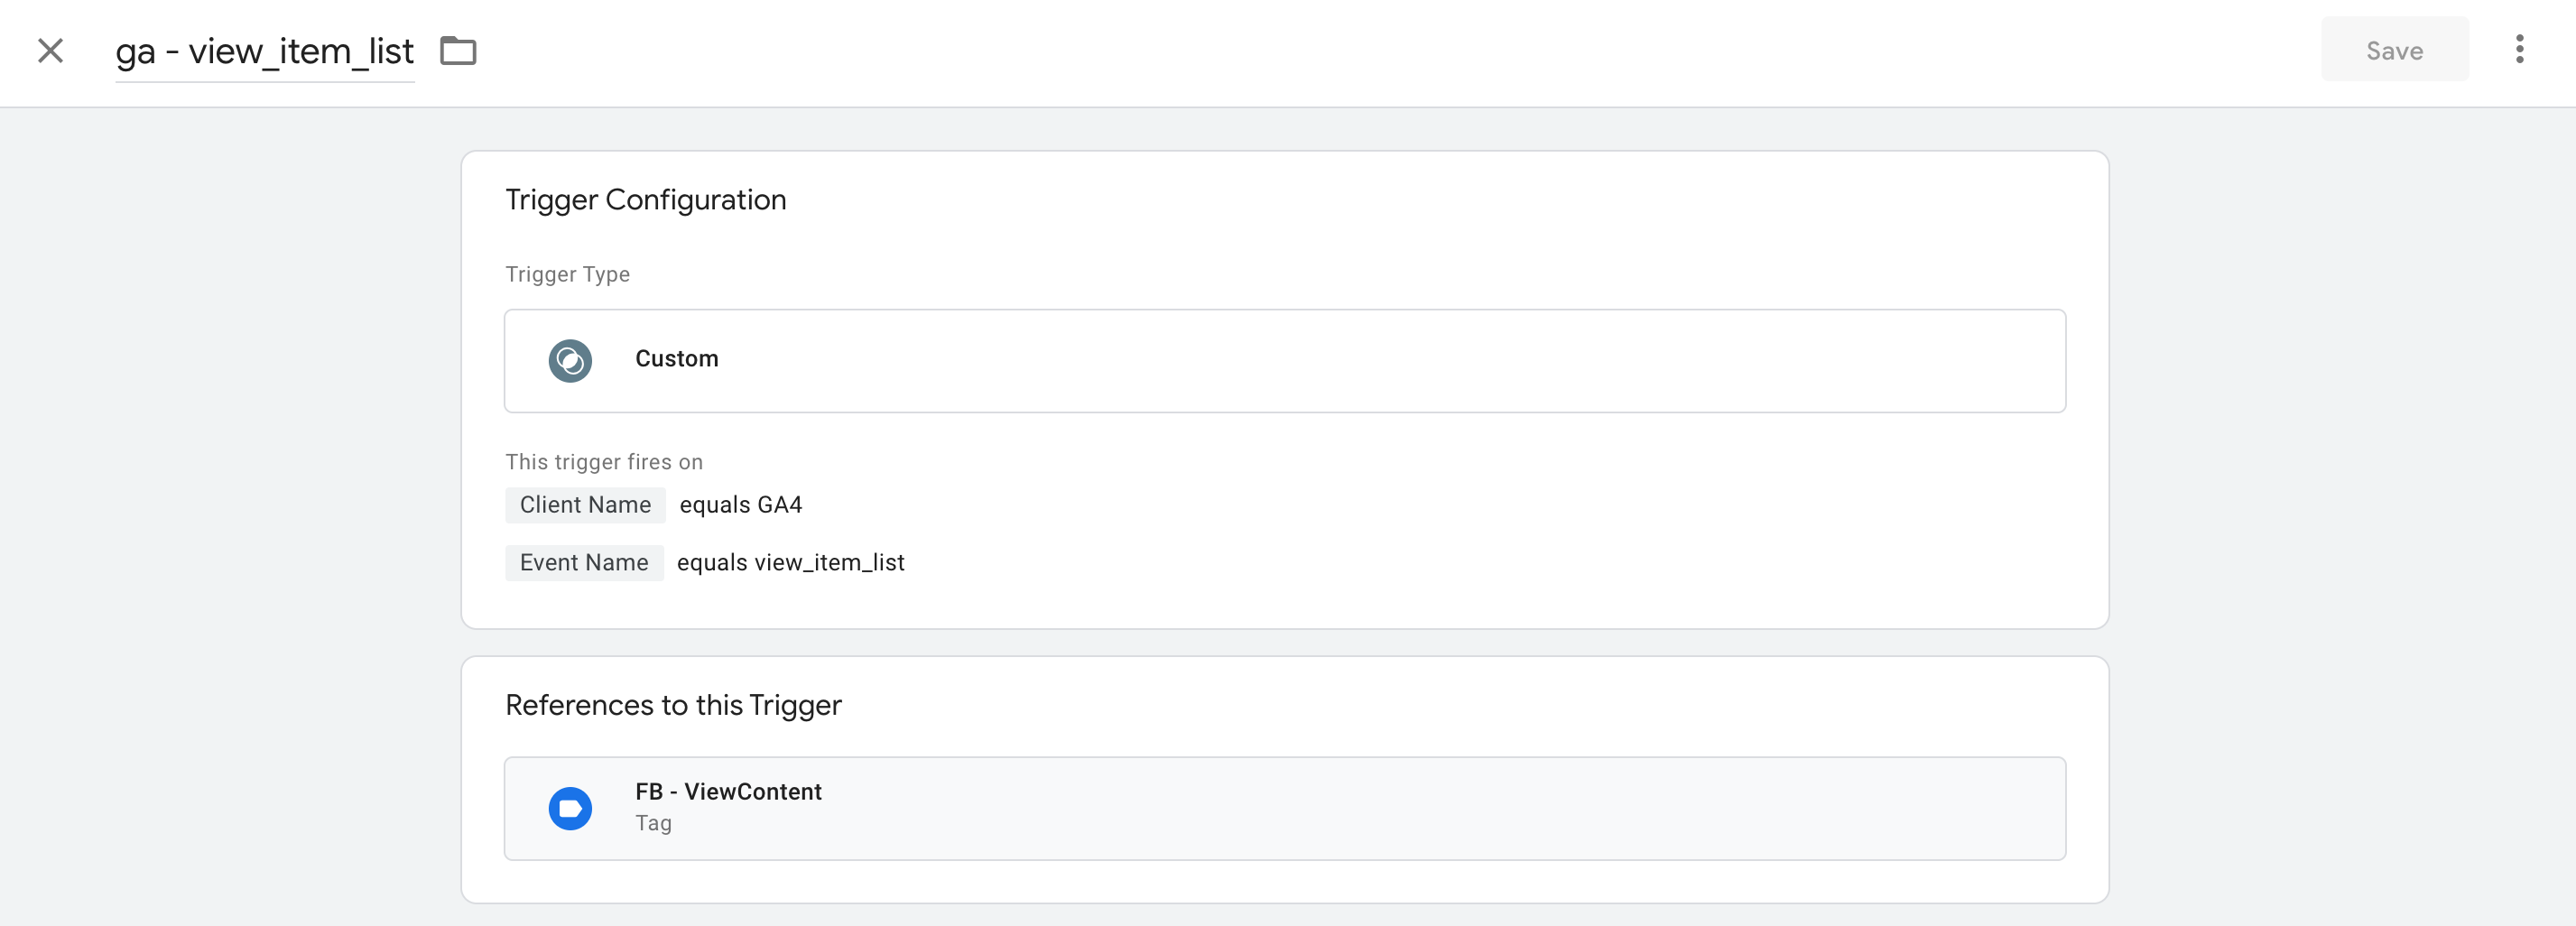
To set up other events go to Google Tag Manager Server Container preview mode, make an action on your site that you want to track inside Facebook and check the event name that UA (or GA4, or Data Tag) sends to your Server Container.
On the screenshot below I want to set up a Facebook event ViewContent when someone opens the product page on my site. To do that I created a new tag inside the Server container, set it to override, selected standard event ViewContent, added API Access Token, Facebook Pixel ID. I also added User Data and Events Data. And made a new trigger event name equals view_item_list and Client Name equals GA4.
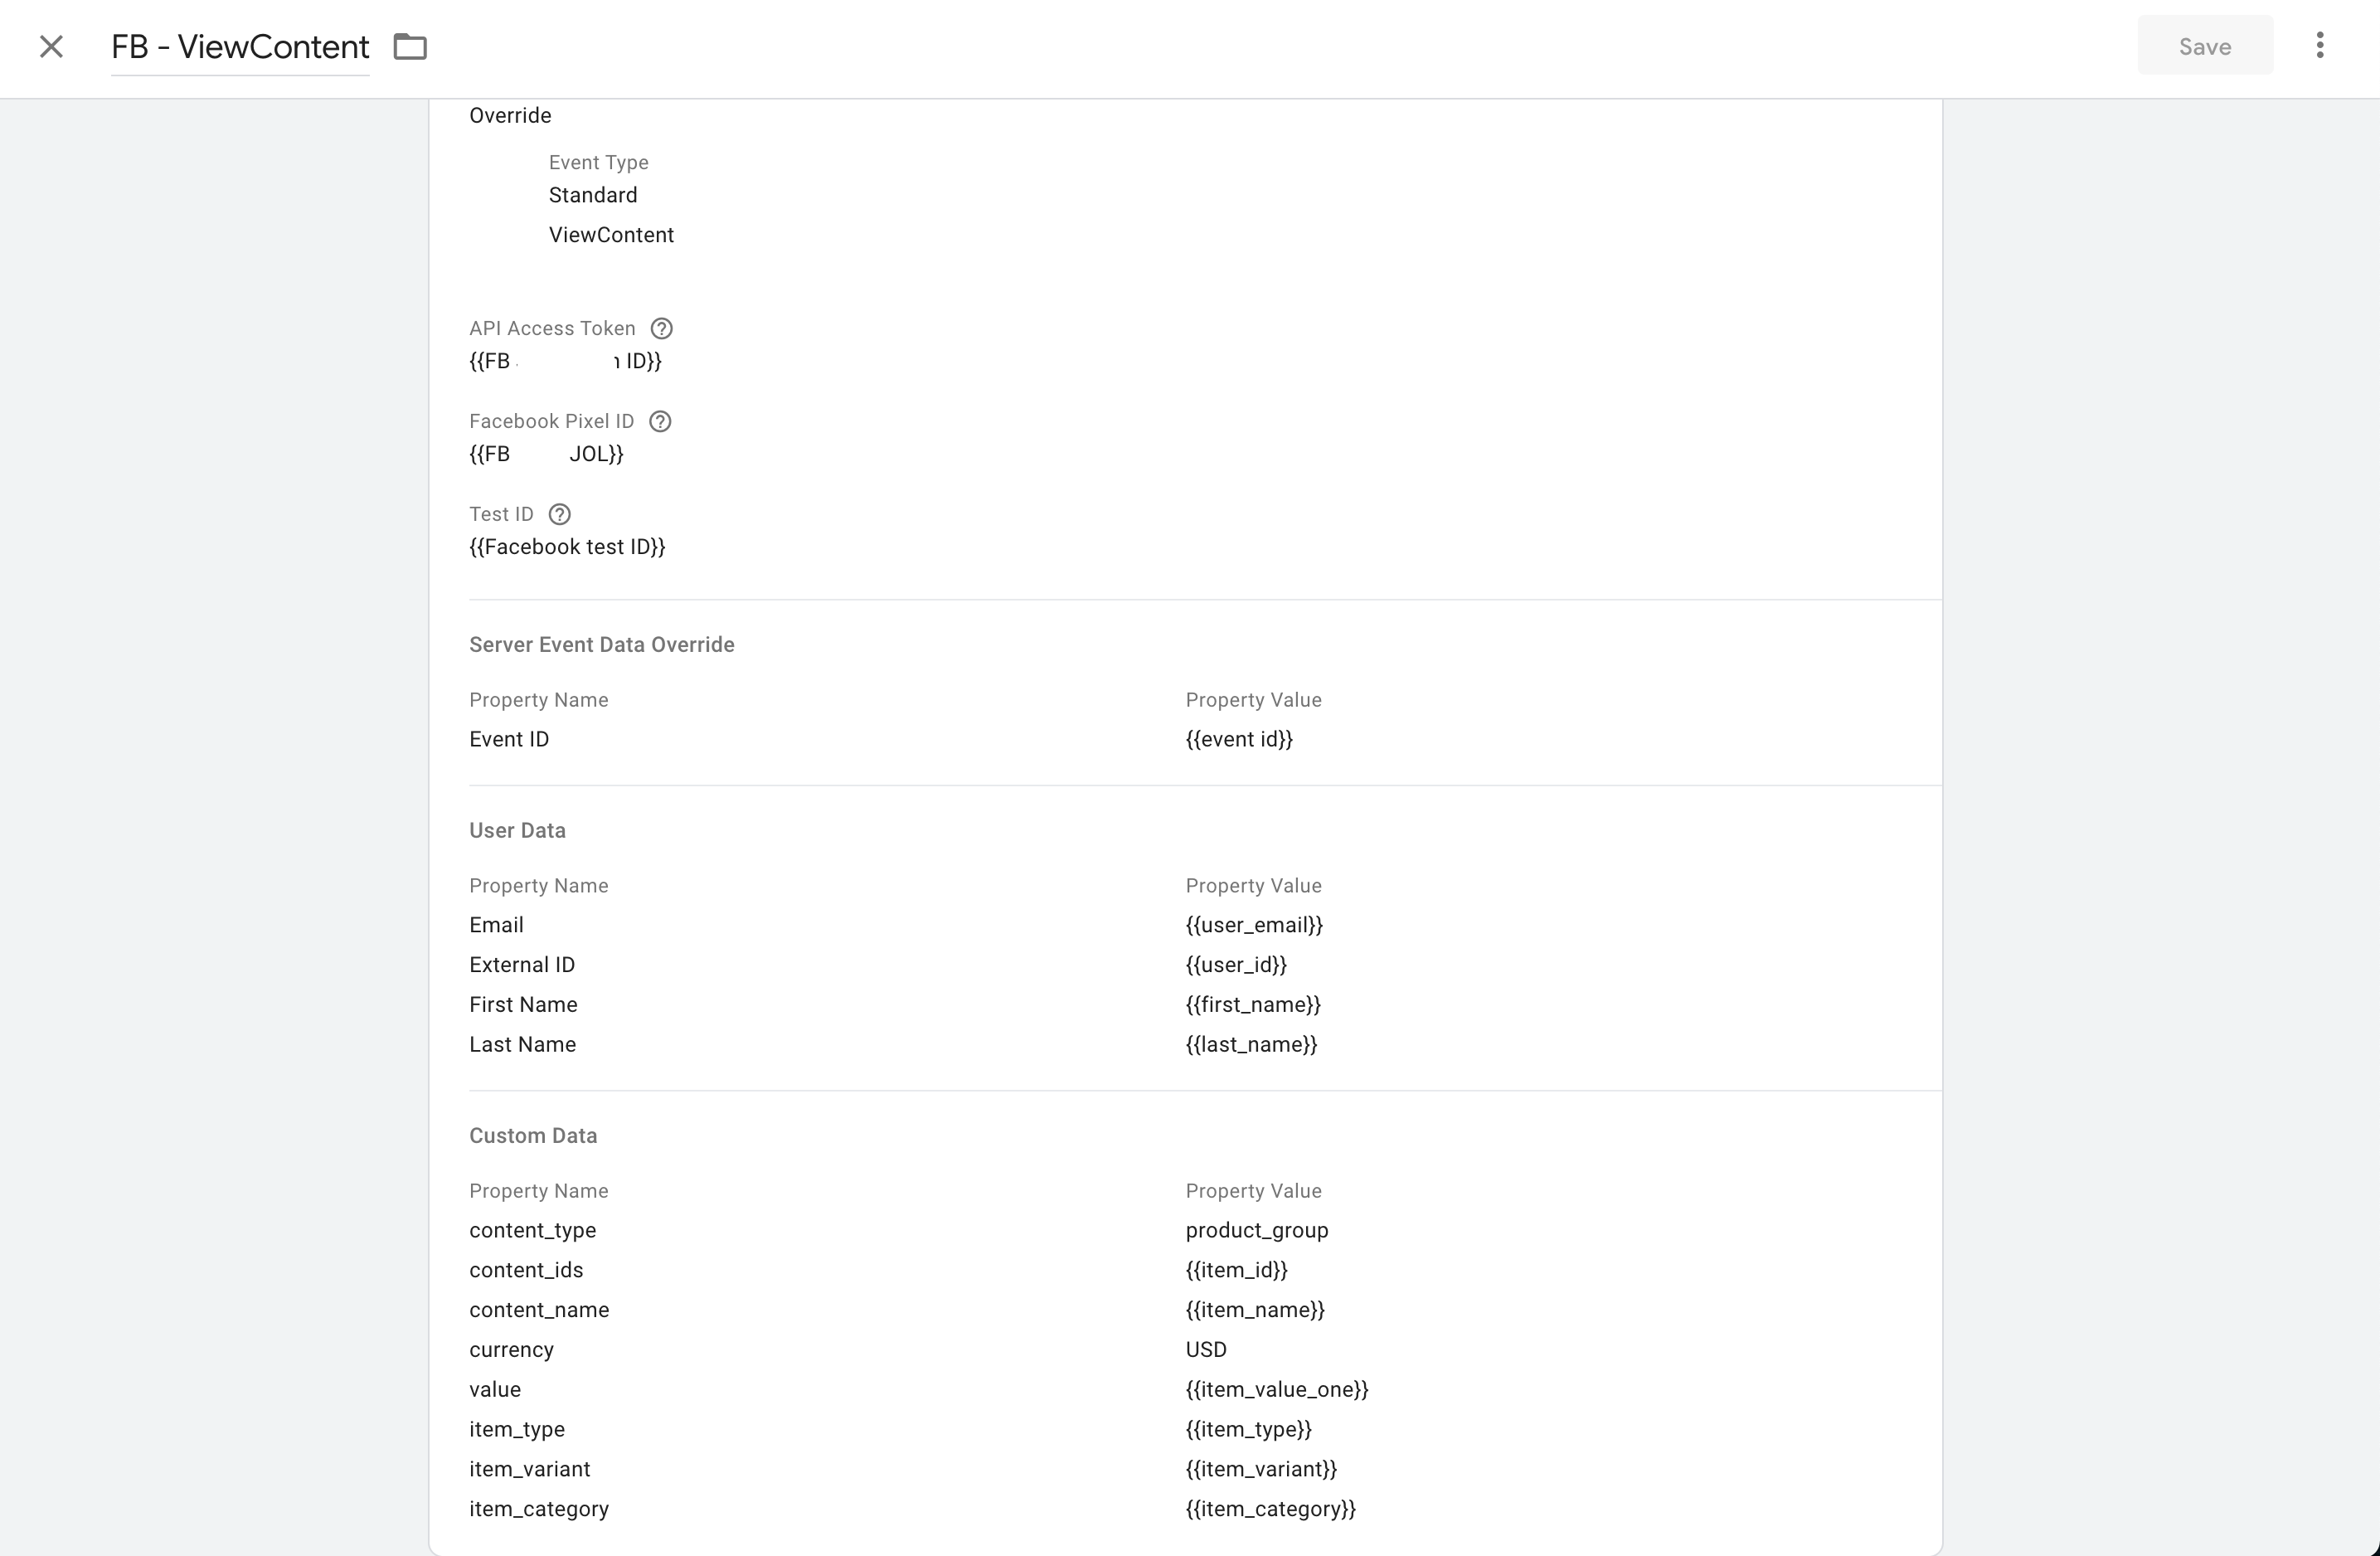
6. You can pass custom parameters using fields Server Event Data Override, User Data and Custom Data. You can send users data to increase the matching score on Facebook via field User Data, note that users’ information that you want to send to Facebook conversion API should be hashed. Our Facebook tag automatically hashes needed data.
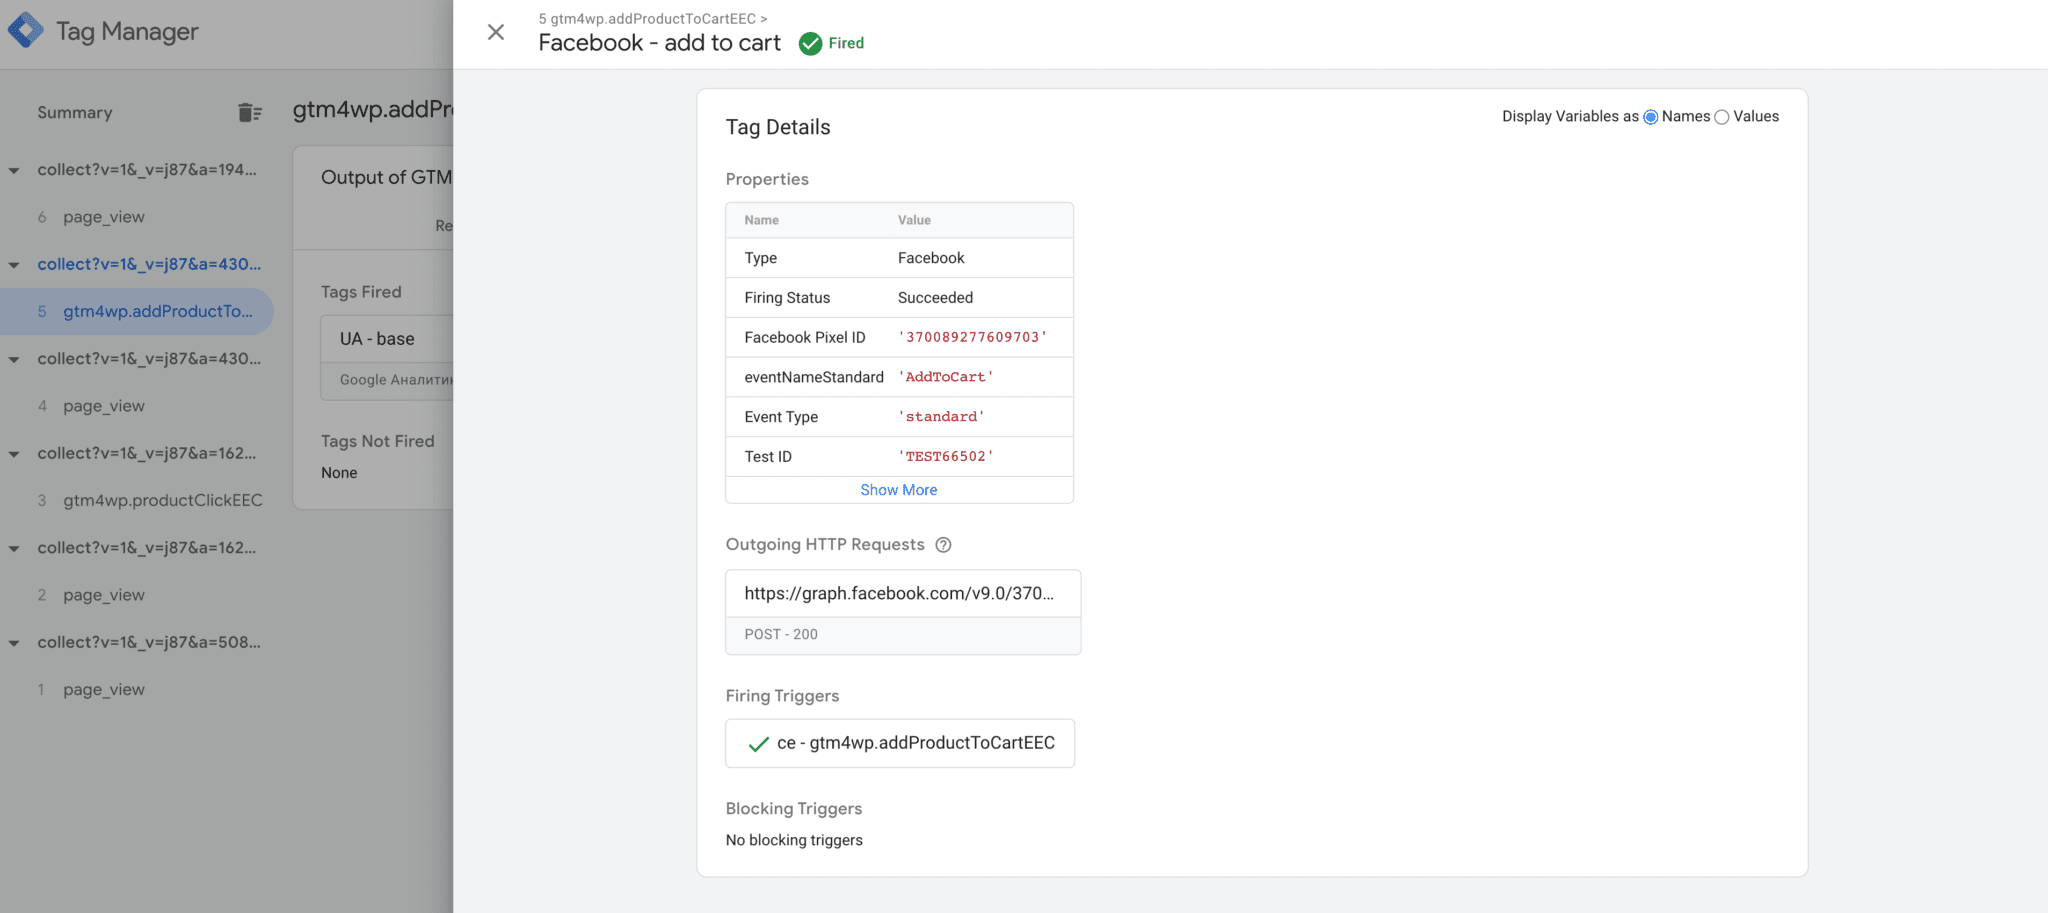
7. When you are done setting up all your Facebook events, open Google Tag Manager debug mode and test if Facebook events work correctly. You can also go to your Facebook tag inside the server container and add Facebook test ID. You can find the test ID inside the Facebook events manager under the test events tab. For more instructions on how to test Facebook conversion API, check this article.
8. Once you’ve set up and verified that Facebook conversion API works correctly, you need to remove FB browser tracking or set up event deduplication. Otherwise, your events will be duplicated.
Event deduplication for Facebook pixel and conversions API events
Facebook recommends using bother Facebook pixel and Conversion API. But if your site will send the same events using both the pixel and Conversions API, events may be duplicated since FB will receive the same information from the browser and the server.
Facebook has a deduplication feature. If they know that the browser and the server events are identical, they can keep only one.
Setting up event deduplication is a must if you want to send all events from both the server and the browser. Without event deduplication, your data won’t be accurate, and it may affect your Facebook campaigns.
To set up FB Conversion API deduplication, you need to send unique event IDs from the browser and the server. The same events from both the browser and the server should have the same event ID.
We created a custom variable that generates a unique ID for each event. You can add it to your web container using this link to the template gallery. Use this variable to send event ID for Facebook pixel inside the web container and Facebook conversion API using server container. We have a more detailed description of how to set Facebook event deduplication.
You can pass unique event ID from the web container to the server container using Google Analytics custom dimension or Data Tag and Data Client.
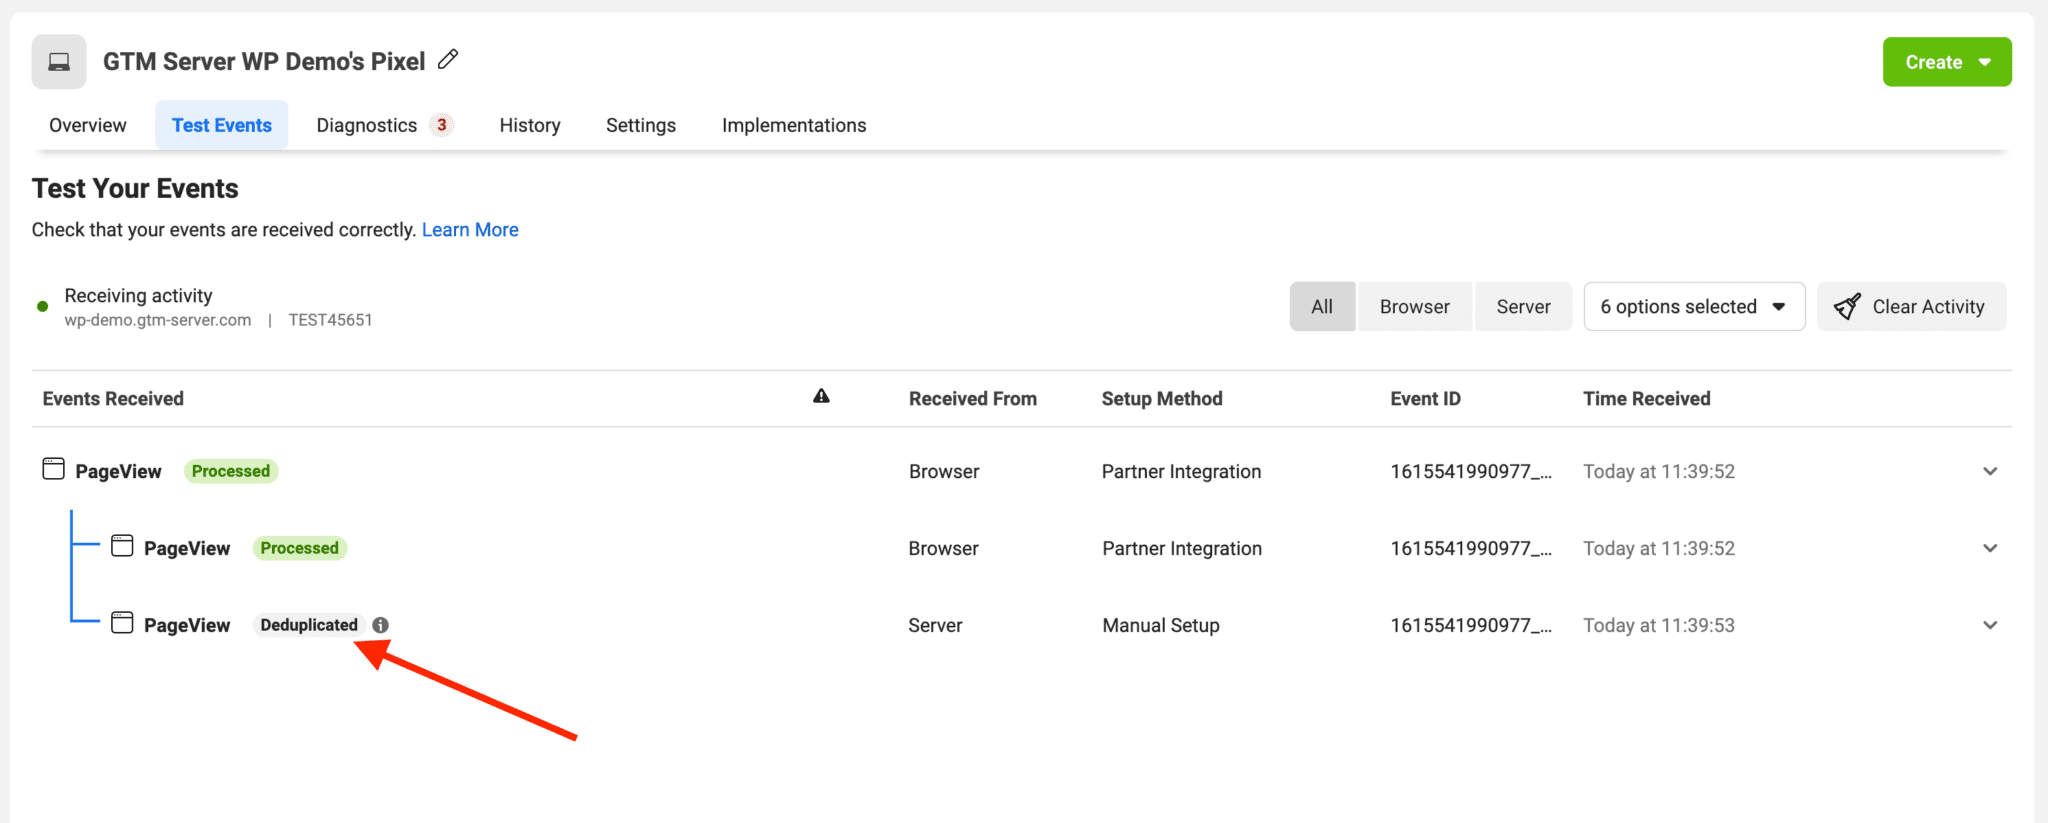
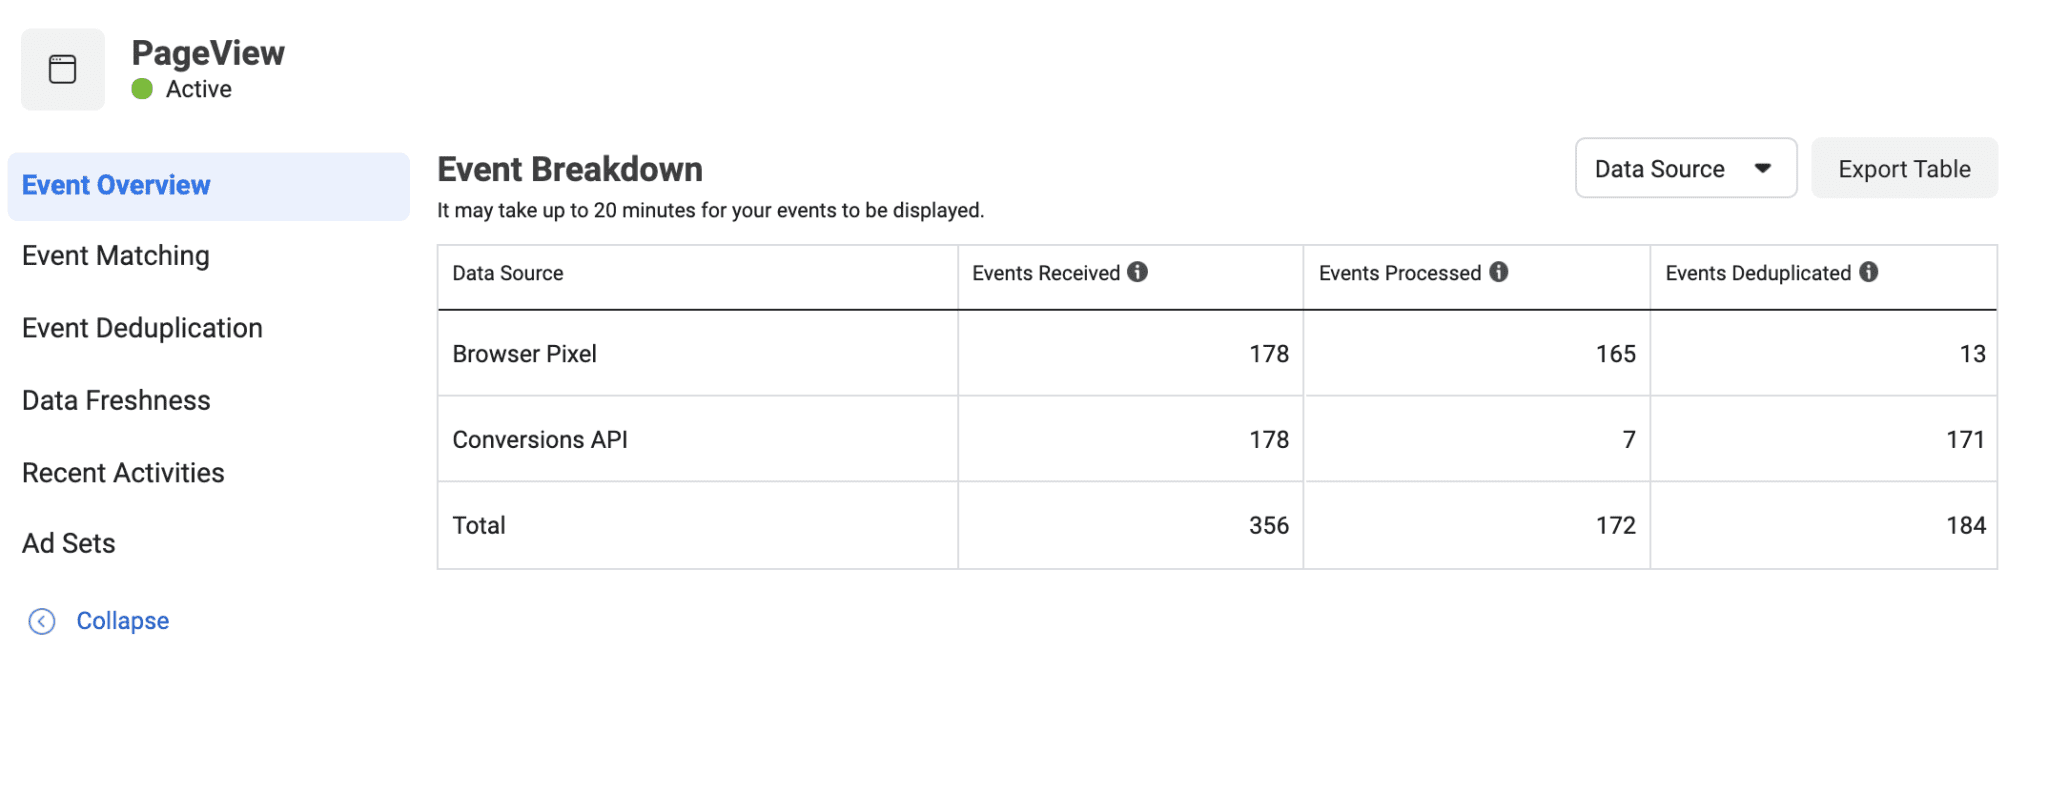
If deduplication is set up correctly, you should see it inside the events manager testing tool. And after you publish all changes to the production, you can click on the event details to see the number of events Facebook received from the browser and the server. How many events they processed and deduplicated.
Send user parameters using Facebook conversion API
To match users who visit your site with their database, Facebook uses User Data for Conversion API. They require to send at least one of the user parameters inside the Facebook conversion API events.
FB requires to hash some parameters before sending it to Facebook. The more user parameters you send to Facebook, the higher chances they will match a user and the higher event match score you’ll get.
Sending user parameters from your site to Facebook is a sensitive topic since you’ll share users’ data with 3rd party service. So before sending this data to FB, make sure it complies with the privacy policy.
If you decide to send user parameters to Facebook CAPI, then where will you get it? You can use either Google Analytics or a Data Tag for the Google Tag Manager web container and Data Client for the server container to address this issue. These two should work together; Data Tag is created to send data from the web container to the server container, while Data Client listens to this tag and retrieves information. We have a more detailed description of sending data from the Google Tag Manager web to the server container.
Data Tag will automatically hash user data that should be hashed according to Facebook requirements. If you use our Facebook Conversion API tag, Data Tag and Data Client, the Facebook tag will automatically process all needed events and parameters from the Data Tag. No need to send it manually. Just make sure you set up all triggers and variables correctly. With the Data Tag and Data Client’s help, you can send DataLayer from the Google Tag Manager web container to the event data inside the server container.
Conclusion:
That’s it. I hope you’ve successfully moved Facebook tracking to the server. Facebook Conversions API is a great tool to get a better understanding of who your customer is, see the full customer journey up until the conversion takes place, and feed more data about your users to Facebook machine learning algorithms.